How To Enable SSH On The Steam Deck
This guide explains how to enable and use SSH on your Steam Deck for remote access to your files. The Steam Deck's desktop mode opens up possibilities beyond gaming, and SSH provides a secure way to manage files remotely.
Enabling SSH on Your Steam Deck
 Follow these steps to enable SSH:
- Power on your Steam Deck.
- Access the Steam menu (usually a button).
- Navigate to Settings > System > System Settings > Enable Developer Mode.
- Return to the Steam menu.
- Select Power > Switch to Desktop Mode.
- Open Konsole (the terminal) from the Start menu.
- Set a password (if you haven't already):
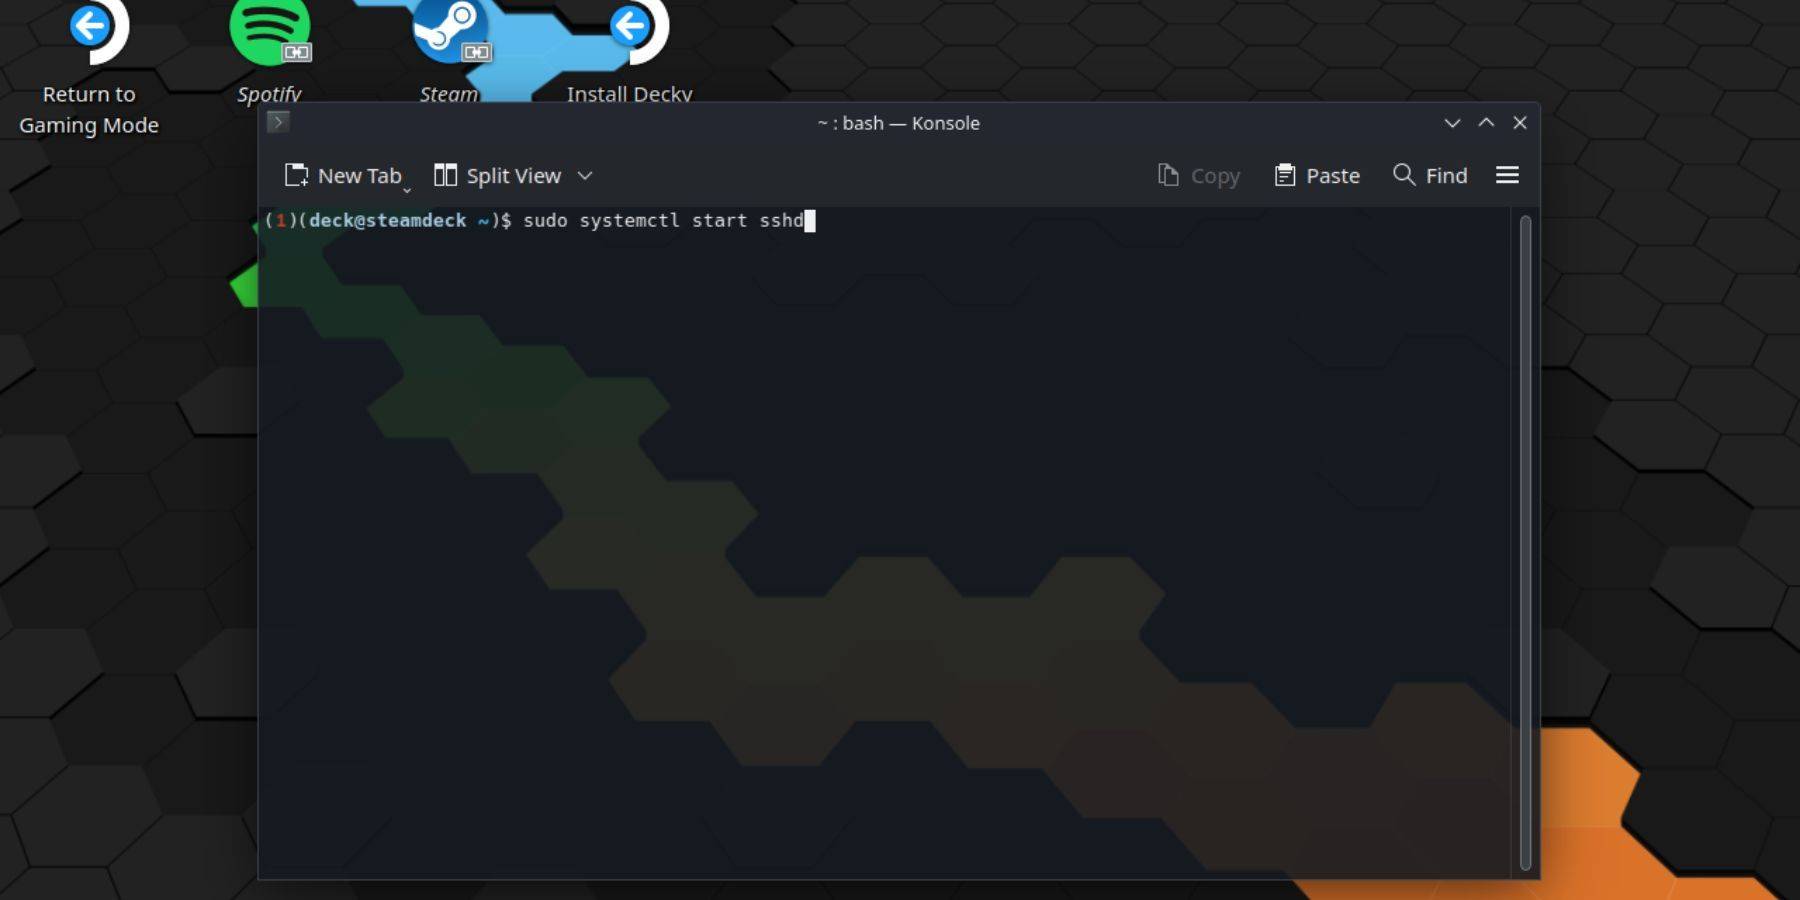
passwd. Create and confirm your password. - Start the SSH service:
sudo systemctl start sshd. - Enable SSH to start automatically on reboot:
sudo systemctl enable sshd. - You can now access your Steam Deck remotely using an SSH client.
Important: Avoid modifying or deleting system files to prevent OS corruption.
Disabling SSH on Your Steam Deck
To disable SSH:
- Open Konsole from the Start menu.
- To disable SSH on reboot:
sudo systemctl disable sshd. - To immediately stop the SSH service:
sudo systemctl stop sshd.
Connecting to Your Steam Deck via SSH
 After enabling SSH, you can use a third-party SSH client. Warpinator is a user-friendly option. Install it on both your Steam Deck and your PC, then launch it on both devices simultaneously for easy file transfer.
For Linux users, simply open your file manager and enter sftp://deck@steamdeck (replace deck with your Steam Deck's hostname if different) in the address bar. You'll be prompted for the password you set earlier.


-

Soccer Heroes RPG
-

Pregnancy Guide - Baby Tracker
-

ရွှေနားဆင် Myanmar Audio Books
-

uLog - Who Viewed My Profile
-

Child Growth Tracking
-

PedalboardPlanner
-

CartusMobile
-
Rugăciuni puternice ortodoxe
-

Lotto Number Generator China
-

1C Big Keyboard
-

SlotMan - Free Classic Vegas Slot Machine 777
-

IMDb: Movies & TV Shows
-
1

Top Streaming Platforms for Live Sports in 2025
Jun 18,2025
-
2

GTA 6 Set for Fall 2025 Release, CEO Confirms
Apr 03,2025
-
3

Roblox: CrossBlox Codes (January 2025)
Mar 04,2025
-
4

First ALGS in Asia Emerges in Japan
Jan 19,2025
-
5
![Roblox Forsaken Characters Tier List [UPDATED] (2025)](https://img.jdzca.com/uploads/18/17380116246797f3e8a8a39.jpg)
Roblox Forsaken Characters Tier List [UPDATED] (2025)
Mar 05,2025
-
6
Introducing the Ultimate Guide to Seamless Character Swapping in Dynasty Warriors: Origins
Feb 25,2025
-
7
Gwent: Top 5 Witcher Decks (2025 Update)
Mar 13,2025
-
8

Max Hunter Rank in Monster Hunter Wilds: Tips to Increase
Apr 04,2025
-
9

Cute mobs in Minecraft: pink pigs and why they are needed
Mar 06,2025
-
10

Capcom Spotlight Feb 2025 Showcases Monster Hunter Wilds, Onimusha and More
Apr 01,2025
-
Download

Portrait Sketch
Photography / 37.12M
Update: Dec 17,2024
-
Download

Friendship with Benefits
Casual / 150.32M
Update: Dec 13,2024
-
Download

F.I.L.F. 2
Casual / 352.80M
Update: Dec 20,2024
-
4
[NSFW 18+] Sissy Trainer
-
5
Pocket Touch Simulation! for
-
6
슬롯 마카오 카지노 - 정말 재미나는 리얼 슬롯머신
-
7
Chubby Story [v1.4.2] (Localizations)
-
8
Life with a College Girl
-
9
Shuffles by Pinterest
-
10
Hunter Akuna